If you’re an avid gamer, you know how fast technology can change. Keeping up with new computer components can be quite challenging, and you may have to buy a new Alienware laptop.
Before you explore this option, you may wonder:
Can I upgrade components on my current Alienware laptop?
Can you upgrade your Alienware laptop?
Alienware laptops are upgradeable. You can upgrade your GPU and CPU amongst other parts, but with serious limitations. These laptops aren’t as infinitely malleable as Dell had initially intended and that’s a bit of a disappointment for most gamers and laptop enthusiasts.
A good demonstration of Alienware’s upgradability and limitations is the flagship Alienware Area-51m R1.
Generally, these laptops come loaded with breathtaking GPUs. If you want more juice for your AAA games, however, you can always upgrade your graphics module.
Dell sells their Area-51m range of laptops on the promise of powerful upgradability. They made good on this promise by shipping the R1 with a bespoke Dell Graphics Form Factor (DGFF).
This DGFF allows you to upgrade your CPU and GPU without having to replace your motherboard.
Dell also shipped GPU upgrades for Area-51m R1 laptops with lower performance GTX 1660i and RTX 2060 graphics cards.
You could replace these modules on your motherboard with better RTX 2070 and 2080 graphics cards.
Unfortunately, Dell didn’t expressly state that you could only upgrade your laptop with modules from within its current generation of graphics cards.
This limitation became apparent when Dell began to ship the Alienware Area-51m R2 version.
Most R1 owners expected to switch their RTX 2070 and 2080 GPUs with the RTX 2070 Super and 2080 Super versions that already came standard with the R2.
However, they couldn’t make this switch because these new GPUs use a different socket format in the R2 DGFF.
The same is true for CPUs. The R1 ships with 9th Generation Intel CPUs that can take other 9th Gen upgrades but cannot take 10th gen Intel chips.
This meant that R1 owners had to either buy the R2 or stay with their current laptops.
Check Wireless Mouse For Alienware Laptop
Can you upgrade an Alienware laptop GPU?
You can upgrade the GPU on your Alienware laptop but it entirely depends on the laptop itself. Most older Alienware laptops allow you to upgrade your GPU. However, this isn’t always the case with newer versions of Alienware laptops.
For Alienware, this isn’t new. As expected, older Alienware laptops like the m15x and m17x have GPU upgrades.
Even now, you can replace your Radeon HD 5730 GPU module with an NVIDIA GTX 460 or AMD 5850 graphics card.
You can as well upgrade your NVIDIA GeForce RTX 580M to an NVIDIA GeForce RTX 760M card to experience the next level of gaming performance.
Newer versions of Alienware, like the Area-51m R1 and Area-51m R2, have more restrictions on their upgrades. As we stated above, the R1 only gives you the option to upgrade your GeForce RTX 2060 GPU to either the RTX 2070 or RTX 2080.
Unfortunately, you cannot upgrade your R1 GPUs with the RTX 2070 and 2080 Super versions that come with the R2. The R1 DGFF cannot support the new GPU and CPU sockets.
This backward incompatibility is partly Intel’s fault because their 10th Gen chips cannot work on 9th Gen sockets either.
Also, the DGFF bars you from buying third-party upgrades.
Can you upgrade an Alienware laptop processor?
You can upgrade your Alienware laptop processor, but only on the Area-51m R1. This gaming laptop gives users the chance to upgrade their CPU on the DGFF. No other Alienware laptop has this flexibility.
Even CPU upgrades on the R1 are restricted to only chips of the same generation. You cannot upgrade your processor to the 10th Gen version available on the R2 because of backward incompatibility.
What else can you upgrade?
If you’re looking at secondary upgrades, you can get so much more for your Alienware laptop. These are:
RAM
You can upgrade your CPU from the standard 8GB DDR4 RAM to the 64GB behemoth that will give you outstanding performance during your gaming activities.
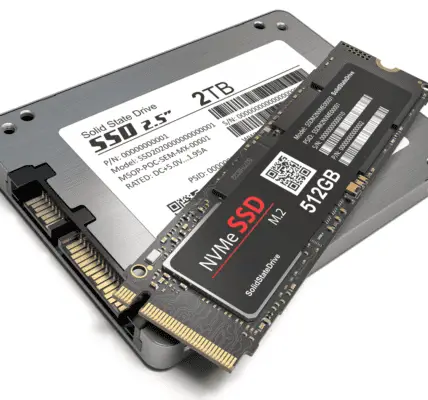
Storage (HDD or SSD)
Alienware laptops come with internal storage of at least 512GB SSD and extra HDD storage units with varying capacities.
Battery
You can upgrade your battery to extend its capabilities. Most Area-51m’s, for example, come packing a 90Wh battery and you may require two different power adapters to have your laptop running on steroids.
What do you need to upgrade your Alienware laptop?
Every gamer has different needs and different budgets. There’s no one-size-fits-all approach to upgrades. Some laptop owners may upgrade their RAM or SSD. Others may only upgrade one component while others would upgrade several.
However, to upgrade your Alienware laptop, you’ll need:
- A new compatible CPU chipset
- A new compatible GPU module
- Higher RAM
- A better/newer Battery
- New HDD or SSD Storage
How to upgrade your Alienware laptop?
Only the Area-51m R1 can take extensive upgrades. Therefore, that’s what we’ll feature.
What you can change/upgrade:
You can change:
- The GPU
- The CPU
- The RAM
- The Internal Storage
What you need before opening your Area 51m laptop.
You’ll need:
- Component upgrades
- A set of computer screwdrivers
- Your Area-51m R1 laptop
Before you begin to disassemble your laptop, make sure you take the following actions:
- Save and close all open files and programs.
- Shut down your computer
- Disconnect your laptop from all electrical outlets
- Disconnect any attached peripheral devices and remove any optical disks or flash drives.
Doing this prevents you from losing unsaved data or damaging your laptop.
How to remove the Area-51m R1 Base Cover
- Flip over your Area 51 laptop. You’ll see six different captive screws fastening the cover to the chassis of the laptop.
- With a compatible screwdriver, remove all six screws from the laptop. You’ll notice a gap appear on the lower back side of the cover. This gap helps you safely snap the back cover off your laptop with ease.
- Once you snap the back cover off, flip it open and you’ll expose a majority of the components of your laptop.

From here, you’ll be able to swap out and replace the battery, SSD storage, 4 memory slots and the Wi-Fi card. Getting to the CPU and GPU is quite a daunting process, but with some patience and the Alienware Area-51m service manual, you’ll get it done in no time.
Consider getting a cooling pads for your Alienware laptop to protect it from over heating.
How to change the CPU/GPU:
To get to the CPU and the GPU, you’ll have to remove seven different layers. Take care to remove every layer care in the specified order to prevent damage to your device or its components.
Remove the battery. To remove it:
- Disconnect the battery cable from the motherboard using the pull tab. Remove it from the routing guides on the base of the computer to free it.
- Remove six screws that hold the battery in place on the palm-rest assembly of your laptop.
- Lift and take the battery off the palm assembly.

Remove the wireless card. To do so:
- Locate the wireless card on your computer

- A screw secures the bracket that holds the wireless card to the motherboard of the laptop. Remove it.
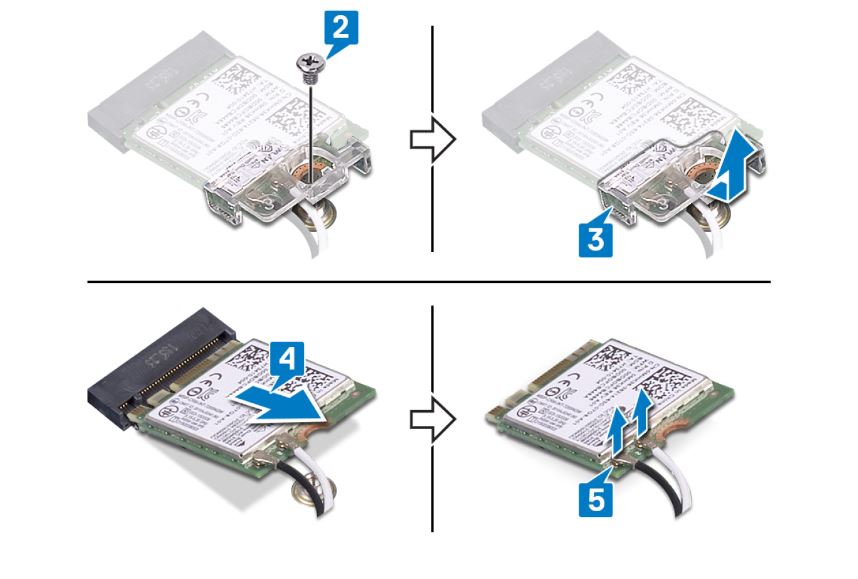
- Take the card out of the card bracket
- Slide this card out of the wireless card slot.
- Disconnect the antenna cables attached to the wireless card
Remove the Solid State Drive. To do so:
- Remove a single screw that holds the thermal shield and the SSD to the base of the computer
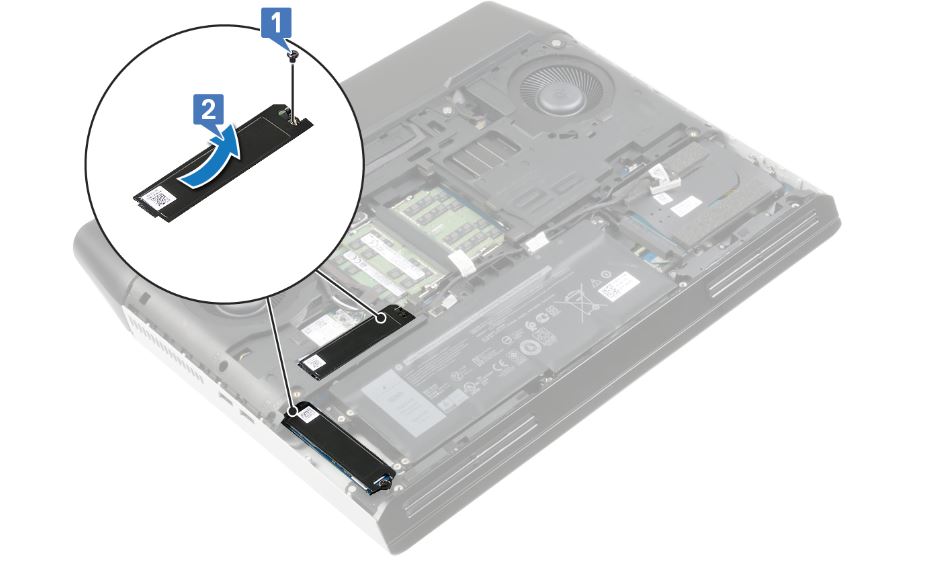
- Slide and lift the thermal shield out.
- Slide and remove the M.2 SSD from the SSD slot on the computer board.

Remove the rear I/O cover.
- Detach the tron-light fiber cable from the motherboard by peeling it off from its socket

- Remove the four screws that hold the rear I/O cover to the computer base.
- From the palm-rest assembly, remove two screws that secure the I/O cover.
- Push the I/O cover away from the computer base using its rubber feet.

Remove the Computer base.
- Use the pull tab to detach the hard-drive cable from the computer base
- Remove this cable from the routing guides on the base of the computer
- Detach the tobii cable from the motherboard

- Remove the antenna cables from their routing guides.
- Remove the screw that holds the display-cable bracket on the computer board
- Lift the display-cable bracket and remove it from the board
- Disconnect the display cable from the board using the pull tab.
- Disconnect the camera cable from the board
- Peel the display cables off the computer base
- Peel the camera cables offs the computer base
- Remove the screw that secures the base to the palm rest assembly.
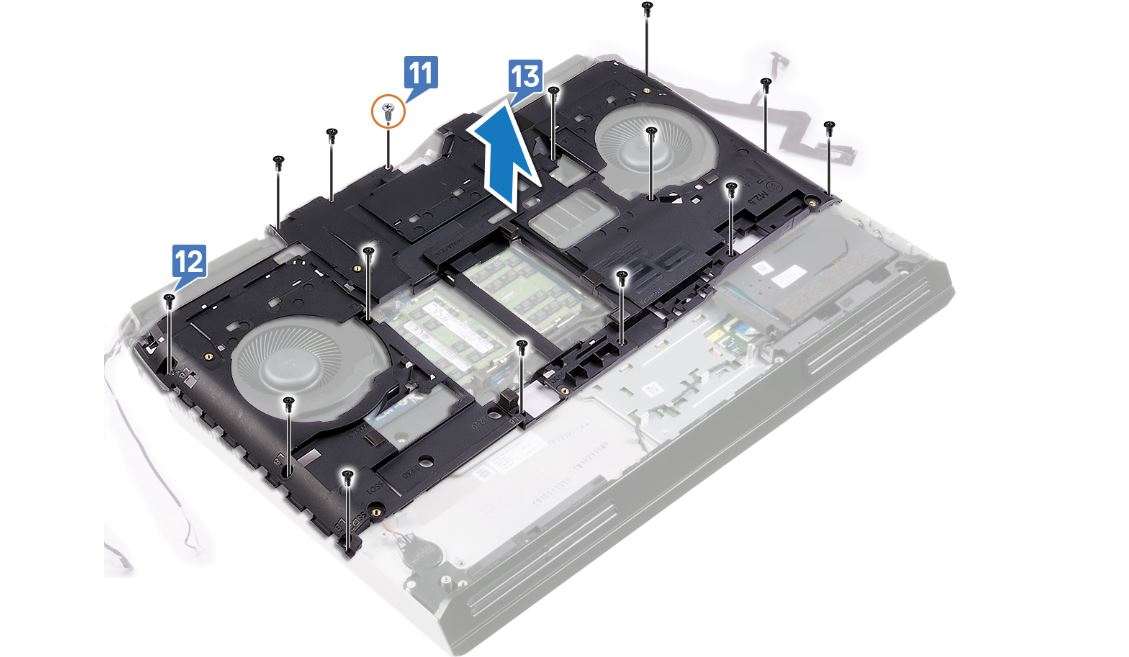
- Remove 14 screws that hold the computer base to the palm rest assembly
- Lift and remove the computer base off the palm-rest assembly.
Remove the heat-sink assembly
- Disconnect the fan cables from the computer board.
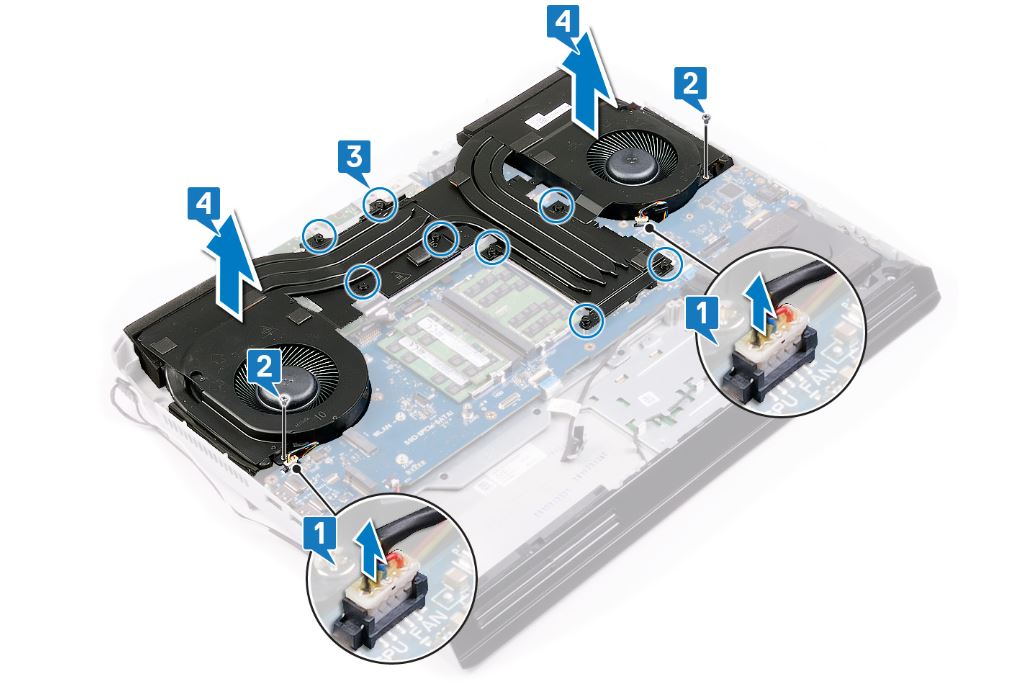
- Two screws hold the heat-sink components to the palm-rest assembly. Remove them.
- In reversed order as demonstrated below, unscrew the 8 captive screws that hold the heat-sink assembly on to the computer board
- Lift and remove the heat-sink assembly off the computer board.
To change the CPU:
- Locate the processor on the motherboard
- Pull the lever on the processor down and push it away from the processor.

- Pull the lever back and open the processor cover
- Lift the processor up and remove it from the motherboard.

- Align the triangle on the new processor to the triangle in the processor socket
- Place the processor in the socket and close the processor cover.
- Push the lever on the processor to cover and lock it into place.
To change the GPU:
- Disconnect the GPU power cable from the motherboard.
- Disconnect the GPU power cable from the GPU itself.

- Remove the two screws that secures the GPU cable to the graphics card.
- Remove three screws that secure the GPU to the system board
- Lift and remove the GPU from the motherboard.
- Replace the GPU on the motherboard and align it with the screw holes on the board.
- Replace the three screws that secure the GPU to the motherboard.
- Replace the two screws that hold the GPU cables to the GPU module.
- Reconnect the GPU power cables to the GPU module
- Reconnect the GPU module power cable to the motherboard.
Final thoughts:
Don’t worry so much about upgrading your laptop. You can also check out Alienware’s online manual if you want to upgrade other parts that we haven’t covered in this piece.